
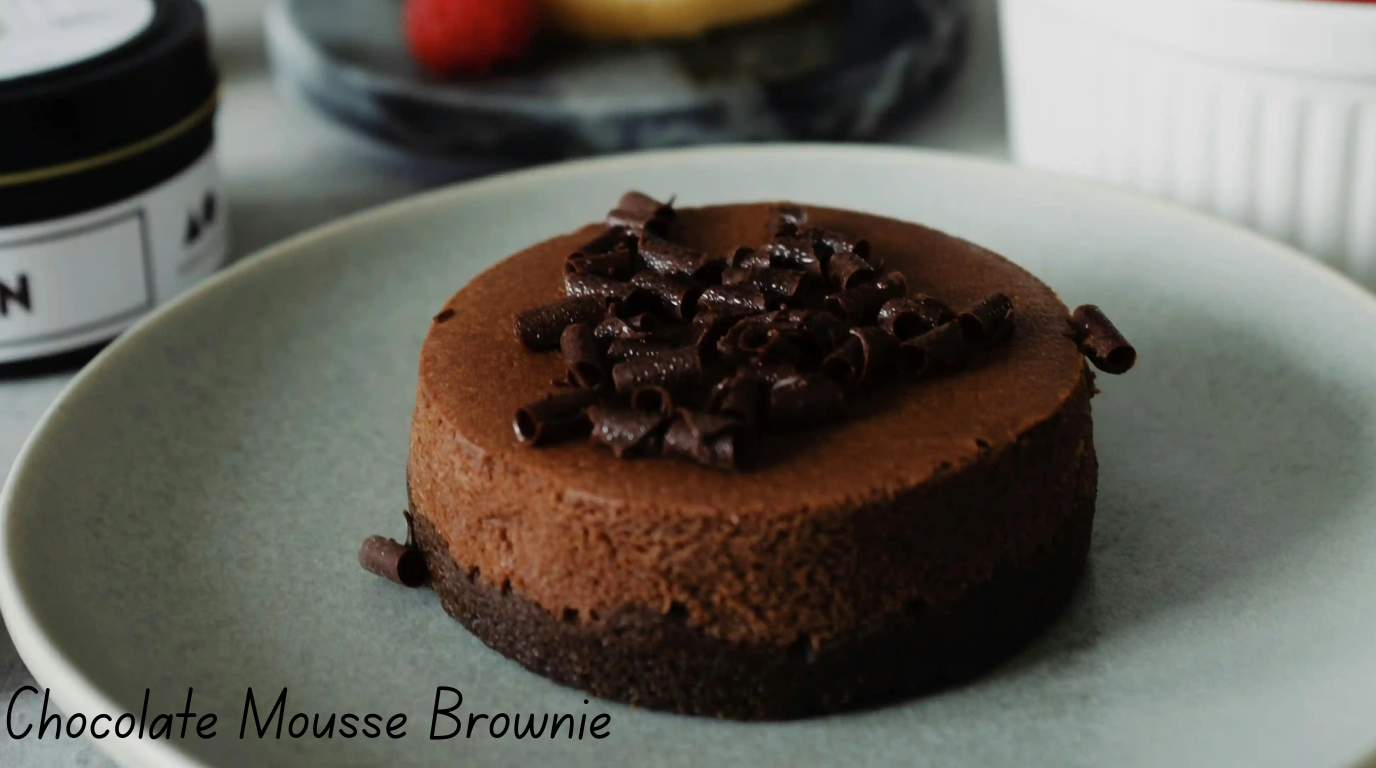
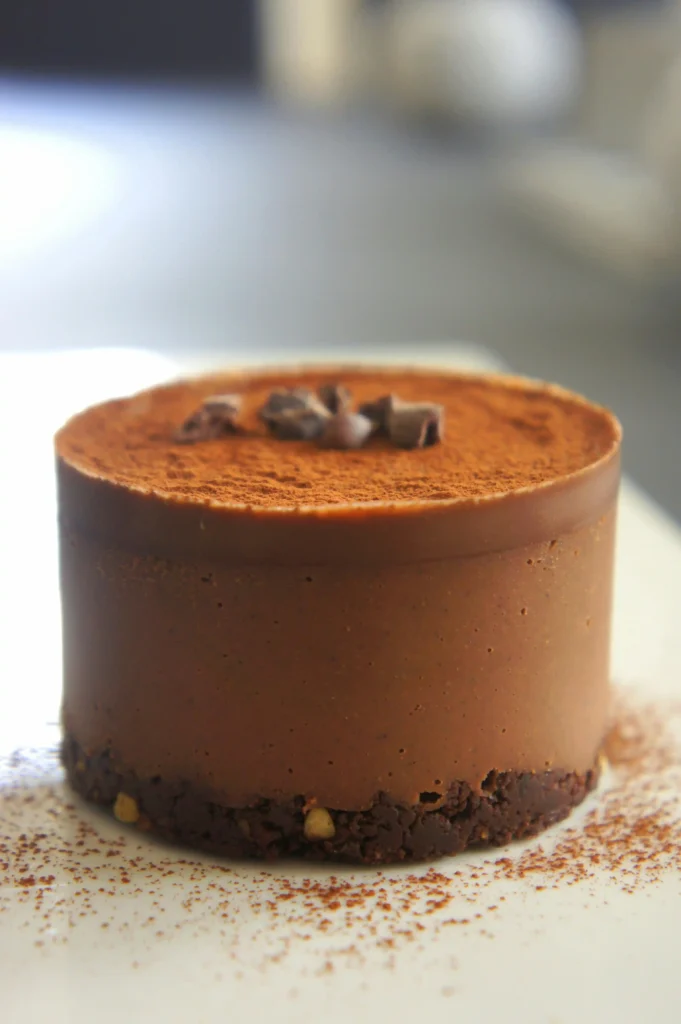
Imagine sinking your fork into a dessert that’s rich, creamy, and absolutely unforgettable. That’s exactly what you get with this Chocolate Mousse Brownie—a luscious three-layer treat that combines a fudgy brownie base, airy chocolate mousse, and a fluffy whipped topping.
If you’re someone who lives for indulgent chocolate desserts, this one’s for you. It’s the perfect blend of textures and flavors, making it a standout at any gathering or a sweet way to elevate your everyday. Best of all, it’s surprisingly simple to make and can be prepared ahead of time—ideal for both planners and spontaneous bakers alike.
Let’s bring your chocolate dreams to life, one delicious layer at a time.
Table of Contents
1. Key Benefits
There’s a reason this Chocolate Mousse Brownie recipe is a total crowd-pleaser—it’s layered with more than just flavor. It’s got convenience, elegance, and pure chocolate bliss baked right in. Here’s why you’ll fall in love with it:

✅ Triple-Layer Indulgence
Each bite offers the best of all worlds:
- A fudgy brownie base with a deep cocoa flavor.
- A light and creamy chocolate mousse that melts in your mouth.
- A whipped topping that adds a cool, fluffy finish.
This combo creates a balanced, texture-rich dessert that’s both comforting and gourmet.
✅ Simple Yet Impressive
Don’t be fooled by the layers—this dessert is surprisingly easy to make. Each step is straightforward, even if you’re not a seasoned baker. It’s the kind of recipe that delivers bakery-style results without the stress.
✅ Make-Ahead Friendly
Planning a party? Hosting dinner? No problem. This chocolate mousse brownie is best when chilled, so you can prepare it a day in advance and focus on enjoying the moment when guests arrive.
✅ Customizable for Any Occasion
Want to dress it up? Add fresh berries, a caramel drizzle, or chocolate curls. Need a more kid-friendly version? Use milk chocolate in the mousse. This dessert is adaptable to your mood, your menu, or your guests.
✅ Perfect for Chocolate Lovers
If you’re the kind of person who believes chocolate is its own food group, this dessert is calling your name. Rich, smooth, and full of deep chocolate flavor, it satisfies every craving in one dreamy square.
Whether you’re baking for loved ones or just treating yourself, this layered chocolate dessert brings joy to every table—and trust me, it disappears fast. Ready to make something unforgettable? Let’s dive in.
2. Ingredients
To create the perfect Chocolate Mousse Brownie, you’ll need three simple sets of ingredients—one for each delicious layer. Every item plays a key role in building flavor, texture, and that irresistible wow factor.
🟤 Brownie Layer
This forms the rich, chewy foundation of your dessert. It’s deeply chocolaty with just the right balance of gooey and firm.
- 1 cup unsalted butter, melted and slightly cooled
- 1 cup granulated sugar
- 2 large eggs, room temperature
- 1 teaspoon vanilla extract
- 1/2 cup all-purpose flour
- 1/2 cup unsweetened cocoa powder
- 1/4 teaspoon salt
- 1/4 teaspoon baking powder
🍫 Chocolate Mousse Layer
This is where the magic happens—fluffy, smooth, and luxurious. It adds contrast and elegance to the dense brownie base.
- 1 cup heavy whipping cream, cold
- 8 oz dark chocolate (around 70% cocoa), finely chopped
- 1 tablespoon granulated sugar (optional, depending on your chocolate)
- 1 teaspoon vanilla extract

☁️ Whipped Topping (Optional, but Recommended!)
A soft, creamy finishing touch that elevates presentation and taste.
- 1/2 cup heavy cream
- 1 tablespoon powdered sugar
- Chocolate curls or shavings, for garnish (optional)
Tip: Use high-quality chocolate for both the brownie and mousse layers—it makes a noticeable difference in flavor.
Now that your ingredients are ready, let’s turn them into something unforgettable.
3. Instructions
Ready to layer up some chocolate bliss? Follow these step-by-step instructions to create your dreamy Chocolate Mousse Brownie from scratch. Each layer builds on the last to deliver that perfect balance of fudgy, creamy, and airy.
👩🍳 Step 1: Prep the Pan and Oven
- Preheat your oven to 350°F (175°C).
- Line an 8×8-inch baking pan with parchment paper, leaving a bit of overhang on the sides for easy removal later. Lightly grease the paper.
🍫 Step 2: Make the Brownie Layer
- In a medium bowl, whisk together the melted butter and sugar until smooth and glossy.
- Add in the eggs and vanilla extract, mixing until fully incorporated.
- In a separate bowl, sift together the flour, cocoa powder, salt, and baking powder.
- Gradually fold the dry ingredients into the wet mixture using a spatula. Stir until just combined—don’t overmix.
- Pour the batter into your prepared pan and smooth out the top.
- Bake for 20–25 minutes, or until a toothpick inserted in the center comes out with a few moist crumbs.
- Let the brownie layer cool completely in the pan. You can speed this up by placing it in the fridge once it’s cool to the touch.
🍫 Step 3: Prepare the Chocolate Mousse
- Melt the chopped dark chocolate using a double boiler or in the microwave (30-second intervals, stirring in between). Let it cool slightly.
- In a chilled mixing bowl, beat the cold heavy cream until soft peaks form. Add in the sugar and vanilla, and beat until medium peaks form—don’t overwhip.
- Gently fold the cooled melted chocolate into the whipped cream using a spatula. Take your time to ensure a smooth, even mousse with no streaks.
- Spread the mousse evenly over the cooled brownie layer. Use an offset spatula or back of a spoon to smooth the surface.
- Refrigerate for at least 2 hours, or until the mousse is fully set.
☁️ Step 4: Add the Whipped Topping (Optional)
- In a clean bowl, whip the heavy cream and powdered sugar until soft peaks form.
- Gently spread or pipe it over the mousse layer.
- Garnish with chocolate shavings, curls, or even fresh berries if desired.
🍽 Step 5: Chill and Slice
- Place the fully assembled dessert back in the fridge for 30 more minutes before slicing.
- Use a sharp knife warmed with hot water (and wiped dry) to get clean, neat cuts.
And there you have it—your stunning 3-Layer Chocolate Mousse Brownie is ready to steal the spotlight.
5. Serving Suggestions
Now that your Chocolate Mousse Brownie is ready, it’s time to serve it up in style. Whether you’re hosting a dinner party or enjoying a cozy evening, here are some ideas to elevate your presentation and enhance the experience.
🍽️ Perfect for Parties
This dessert is perfect for slicing into neat squares, making it easy to serve to guests at a party or gathering. Its elegant layers and rich flavor are sure to impress, but the best part is that it’s simple to prepare in advance, so you can focus on hosting.
☕ Pair with a Hot Beverage
For a comforting experience, pair this indulgent dessert with a cup of coffee, hot chocolate, or a rich espresso. The bitterness of the coffee or espresso complements the sweetness of the mousse and brownie, creating a perfectly balanced bite.
🍓 Garnish with Fresh Berries
Brighten up the rich chocolate layers by adding a handful of fresh berries like raspberries, strawberries, or blueberries. Their tartness provides a refreshing contrast to the dense, sweet chocolate, and they add a pop of color that looks as good as it tastes.
🍨 Serve with Ice Cream
If you’re feeling extra indulgent, serve your Chocolate Mousse Brownie with a scoop of vanilla or chocolate ice cream. The cool, creamy texture pairs wonderfully with the brownie and mousse, making each bite even more luxurious.
🎉 Special Occasions
This dessert is perfect for birthdays, anniversaries, or holiday celebrations. Its rich layers and elegant presentation make it a standout dessert for any special occasion. For an extra festive touch, top with gold leaf, sprinkles, or chocolate curls.
No matter the occasion, your guests are bound to be impressed by the layers of flavor and the visual appeal of this decadent treat. The best part? It’s as satisfying to make as it is to eat, so enjoy the process as much as the finished product!
6. Conclusion
There’s something truly magical about this Chocolate Mousse Brownie—a dessert that combines three layers of rich, velvety indulgence into one irresistible treat. From the fudgy brownie base to the silky chocolate mousse and fluffy whipped topping, every bite is a perfect balance of textures and flavors. Whether you’re serving it at a dinner party, making it for a special occasion, or simply treating yourself to something sweet, this dessert is sure to impress.
The best part? It’s surprisingly easy to make and can be prepped ahead of time, making it the perfect option for stress-free entertaining. With endless opportunities to personalize and customize, this layered delight will quickly become one of your go-to recipes for chocolate lovers.
So, what are you waiting for? Grab your ingredients, preheat your oven, and get ready to create a dessert that’s sure to wow everyone who takes a bite. The Chocolate Mousse Brownie is here to make every occasion just a little sweeter.
Happy baking!
7. FAQs
1. Can I use milk chocolate instead of dark chocolate?
Absolutely! If you prefer a sweeter flavor, you can swap the dark chocolate for milk chocolate in the mousse layer. Just keep in mind that the overall taste will be less intense, but still deliciously creamy.
2. Can I make this dessert ahead of time?
Yes! In fact, the Chocolate Mousse Brownie benefits from chilling for at least 2 hours, so it’s perfect for prepping the day before your event. Just be sure to store it in the fridge and cover it tightly to keep it fresh.
3. Can I freeze the Chocolate Mousse Brownie?
While the brownie base can be frozen, it’s best to keep the mousse and whipped topping fresh. If you do choose to freeze it, wrap the entire dessert tightly in plastic wrap and foil, then store it in an airtight container for up to a month. Thaw in the fridge overnight before serving.
4. What’s the best way to cut the brownies cleanly?
To get clean slices, use a sharp knife and warm it under hot water. Wipe it dry before cutting each slice to ensure that the mousse and brownie layers stay intact and neat.
5. Can I use a different flour for a gluten-free version?
Yes! You can substitute the all-purpose flour with a gluten-free flour blend. Just make sure to choose a blend designed for baking, and check the consistency of the batter, as gluten-free flours may vary.
6. How can I make this recipe more decadent?
For a richer flavor, try adding a layer of caramel sauce or a drizzle of chocolate ganache on top of the whipped topping. You could also fold in some chopped nuts into the brownie batter for an extra crunch.
7. Can I add more layers to this dessert?
Feel free to get creative! If you want to add another layer, consider incorporating fruit preserves (like raspberry or strawberry jam) between the mousse and whipped topping for a fruity twist, or a thin layer of cookie crumbs for added texture.
These FAQs should help you troubleshoot any questions that arise while making your delicious Chocolate Mousse Brownie. Now you’re all set to impress with this indulgent dessert!
How was this recipe to you ?
There are no reviews yet. Be the first one to write one.